
What is lossless video?
“Lossless” or “Uncompressed” video footage refers to saving as much quality from the source as possible, typically at the cost of storage space. This is usually done by recording with an encoder or codec that minimizes the compression it does before saving to a file.
Why would you want to do this?
There are a few reasons that people would go after lossless recording. A simple reason is wanting to start with the highest quality video possible prior to editing and compressing to upload to a site like Youtube. It is better to do things such as zoom in on a block of text or a menu since and maintain a clear image with lossless footage.
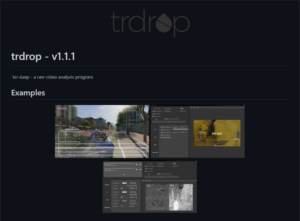
A more technical reason is for analyzing the frame data of that footage to see what framerate a console or PC is actually running at using a program such as trdrop. Whatever the reason, there are a few ways that you can accomplish this.
Recommended Methods
Method #1: OBS Simple Output Mode
First things first, there is an option in NVENC to record lossless footage. It will be the best quality you can get out of NVENC but it, however NVENC is based on H.264 which will have some side effects from compression no matter what.
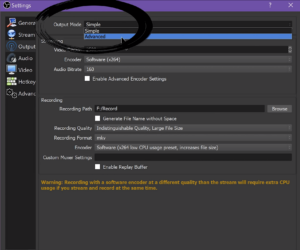
This method is the easiest to set up since it is built into the base OBS installation. To set this up, go into the Output tab in the OBS settings menu and make sure your Output Mode is set to Simple and not Advanced.
To get NEARLY lossless footage with x264 would be to use the Indistinguishable Quality, Large File Size quality setting and the Software (x264 low CPU usage preset, increases file size) encoder option.
This preset is designed to minimize CPU impact to allow you to record high quality footage while still being able to game or stream on the same computer. There is an option for NVENC in the encoder drop down but it can cause performance problems.
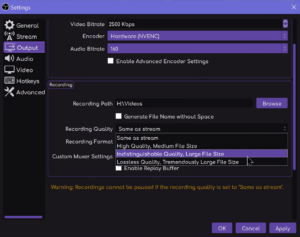
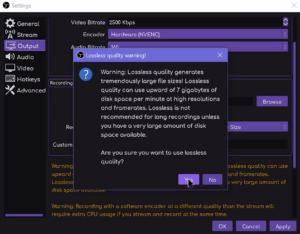
For true lossless quality, scroll down to the Recording section and set the Recording Quality to “Lossless Quality, Tremendously Large File Size”. Choosing this option will cause OBS to give you a popup warning you about just how big the file sizes can get.
This option uses the UTVideo codec which is a free codec that records completely lossless AVI files at ridiculous bitrates to massive files. If you record high resolution or frame rates, you will need to record to an NVME drive since normal hard drives are not likely to be able to keep up with the bit rate that is being recorded. On top of that, these files are very slow to edit since it requires a lot of resources to decode the file.
Luckily, this does not use an obscene amount of CPU power. On top of running a game, the Lossless preset only added about 5% CPU usage whereas the Indistinguishable preset could use up to 25% load.
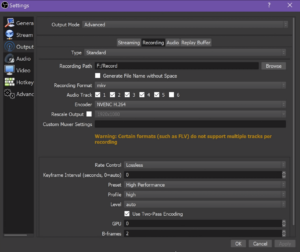
There is one more option which is to use the Custom Output (FFMPEG) settings in Advanced output mode. This will allow you to record to multiple audio tracks if that is absolutely necessary. However, this is a messy and unsupported workflow so your mileage may vary. This video goes into more detail about this if you would like more information.
Method #2: VirtualDub & Amarec
VirtualDub is a separate video capture program that is simple to set up and get rolling with. After installing, go to the Device menu in the toolbar and select your input device. Then go to the Capture menu and select Compression. For lossless recording, you want to use the Lagarith Lossless Codec.
This is another codec that, like UTVideo, records very quickly but will be very slow to edit. Once that is configured, you can go back to the Capture menu and choose Capture Video to start recording.


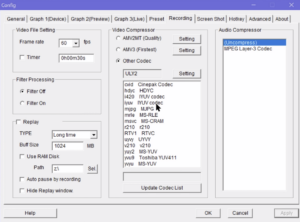
In the same vein is Amarec. This program is quite old but still works well and even has a fairly lag free preview compared to OBS. To use it, download the UtVideo Codec and install both.
Once in Amarec, click on the settings button in the top left corner and go to the Device tab. Choose your capture device and select the format that you want to record at. Next go over to the Recording tab, update the codec list and select the UTVideo option which shows as ULY followed by a number. Hit OK and give it a second to load up your preview and then click on the record button to start recording.

Method #3: ProRes via StreamFX
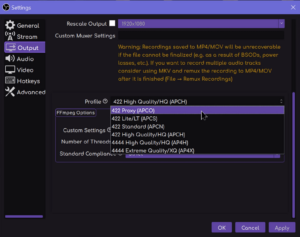
If you are looking to use OBS and want the extra settings from Advanced mode but want to have lossless recording, you can install the StreamFX plugin from Xaymar. This plugin adds more encoders, namely Apple ProRes, to the OBS settings that will allow you to record at a lossless bitrate. If you record with Apple ProRes, you will need to use the mov recording format. Then scroll down to Profile and choose 422 High Quality/HQ (APCH). The last thing to do is to go into the Advanced settings and change the Color Format to I444 and the color range to Partial. Recording to ProRes will use a lot of CPU power to record but will be smoother to edit which is the opposite of how the UTVideo codec operated.


Conclusion
There is no magic behind recording lossless footage. It is supported natively in OBS but there are also other options out there if you choose to go that way. If you record using UTVideo and have Adobe Media Encoder or something similar, it would be helpful for editing to transcode the avi files to either ProRes or GoPro Cineform since they maintain the lossless footage but are much easier on your editor.